Using shrubs or small trees in container gardens provides many options to home gardeners, and landscape contractors as well. Sometimes container gardens are the only way to bring plant life to a patio, deck, porch or other area where there is no ground available to grow plants. We have over 100 container gardens of all shapes and sizes in our gardens, which range from 4 to 48 inches in diameter. One of the great things about containers is that they are mobile - you can move them around as you like.
There are many types of shrubs and small trees that can be grown in containers, and they have many uses. A row of tall growing shrubs in containers can create a boundary or provide a privacy screen. They can be useful on either side of a front door, sidewalk entrance, or at the end of a driveway to accentuate these entryways. They can be useful in garden beds to provide texture, color and dimension. How you use them is entirely up to you.
Growing a shrub or tree in a container or pot is much different than growing one in the ground. Below are a few things to consider before purchasing shrubs and containers to grow them in.
Choosing Plants
Our gardens have quite a bit of shade so we grow a lot of Japanese maples in containers - over 100 varieties now. One of our Japanese maple growing experts has even contributed an article specifically on planting Japanese maples in containers. In sunny areas we grow a lot of conifers and boxwoods; some in topiary forms, and some natural.
Before purchasing containers to plants shrubs or trees in you'll want to choose the plants. Choose shrubs or trees that are known to perform well in pots, and one's that like the environment where the container will be placed.
When selecting shrubs or trees to grow in containers, here's a few cultural requirements to consider:
Pick the spot. First you want to pick a spot where you'd like to grow a shrub or tree in a container. Then you'll be able to monitor and measure the amount of sunlight and wind the site is exposed to.
Consider plant hardiness. When growing shrubs in containers it's important to know that their roots will be exposed to air temperatures, which are often much colder during the winter months than soil temperatures. The general rule of thumb for container plant survival through the winter is that the plant should be hardy to two zones colder than your USDA Hardiness Zone.
How much sun? If the site receives 6 to 8 hours of direct sunlight during the day, select sun-loving plants. If the site receives only morning sun or all day shade or dappled sunlight, choose shade-loving plants. If you'll be combining more than one variety of plant in your container garden, select ones that share similar light requirements. Obviously, sun-loving and shade-loving plants are not very compatible unless the sun-lovers serve as an umbrella for the shade-lovers.
Wind is a factor. Taller shrubs and trees growing in containers are highly susceptible to being blowing over in the wind. So, consider how much wind the site will receive. If too much, lower growing shrubs might be the way to go. Using a heavy, low-profile container that is wider than deeper, and/or placing a heavy weight in the bottom of the container, can provide some extra stability. This being said, one of the great things about containers is that they are mobile - you can always move them to more friendly site.
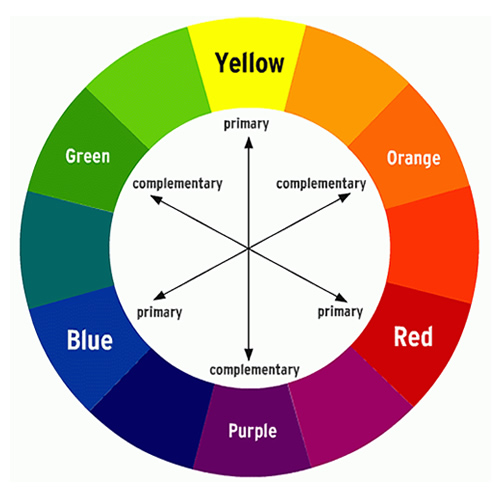
Foliage and flower color. Shrubs come in an endless array of foliage and flower colors. When matching plants to the container, surrounding structures, and other plants in the surrounding area, I like to choose colors that are complimentary.
A color wheel is a diagrammatic way of showing relationships between colors. Colors on the right side of the wheel are warm. Colors on the left side are cool. Colors adjacent to one another are analogous (similar). Opposite colors are complementary.

Color can be used to visually change distance perspective and to set a certain mood.
Warm colors express action. Light tints, such as red, orange, yellow and white, advance an object or area toward the observer. These colors and tints placed near the foundation of a house would make the house appear closer to the street.
Cool colors are restful. Deep shades like blue, green, purple and black recede and can be used to make the house appear farther from the street.
Habit of growth. The branches of trailing or cascading shrubs, such as Purple Pixie Loropetalum, will cascade over the edges of containers or pots. Upright and taller shrubs, such as Degroots Spire Arborvitae, make a great center piece. Upright trees such as Japanese Maples are great for focal points.
Selecting a Container
The first thing you'll want to do is select a container that fits the setting your container garden will be placed in, and that compliments the beauty of the shrub or tree.
Size matters. You want to match the pot size to the size of the shrub or tree. I would recommend choosing a pot that is at least 6 to 12 inches wider than the nursery container the shrub was growing in. This will allow space for new roots to grow and give you at least a few years growth before having to transplant to a larger container.
Too, keep in mind that you'll want to match the size of the container to the size of the space. You don't want to place a giant container on a small patio, and a little 4" pot sitting all alone on a large deck will go unnoticed.
Color and style matters. Use the color chart above to help pick a color of pot that goes well with the colors of the shrub or tree you intend on planting in it, and that goes with the structure and/or the other plants in the area. Pick a style of pot that matches the style of your home or space. For example, if you live in a 1930's cottage bungalow, I don't think you would want to use ultra-modern pots? In the end though, beauty is in the eye of the beholder, so pick pots you like!
Drainage is important! Make sure the pots you select have sufficient drain holes, or are constructed of a material that can be drilled through to make drain holes if necessary. Most clay and concrete pots provide excellent drainage and also allow air movement through the pot. That being said, clay pots are porous so they tend to dry out more rapidly than plastic and glazed ceramic pots.
The Soil
The type of soil you use to grow shrubs or trees in containers is very important. When growing in containers, most types of shrubs and trees will prefer a moist but well-drained soil. Constantly soggy soil can and often will cause root rot or other harmful or deadly plant diseases. I use a a 50/50 mixture of a premium potting mix and a standard potting soil. The potting mix helps hold moisture more evenly throughout the pot and the potting soil will add some weight to the mixture, which can help reduce water needs during the hotter and drier months of summer. You can also add some pumice (maybe 20%) to the soil mixture to help with drainage, especially with shrubs that really need a well-drained soil.
Pumis is an excellent soil conditioner, as it is highly porous providing excellent water, air, and nutrient holding capabilities. Pumice will not decompose or compact over time and is very lightweight. Agricultural grade pumice can usually be found at local feed stores as a product called Dry Stall. The particle size is about 1/8". It's a good idea to wash the product before use to remove the fine particles. If you can't find Pumice you can substitute with perlite.
NOTE: Avoid using native dirt dug out of your yard to fill your container, which will most often lead to death of the shrub due to lack of aeration and poor drainage. Also, do not use straight compost, such as composted cow manure or mushroom compost, which are typically sold in bags. That being said, you can add a double handful or two of a compost to the mix.
Step-by-Step Planting Instructions
STEP 1
Before filling your container with the soil mix, we recommend lining the interior of the pot with shade cloth or a porous landscape fabric. This will keep the drain holes from becoming stopped up with soil and roots.
STEP 2
To remove your shrub or tree from the nursery container it was growing in, firmly grasp the base of the plant and try to gently lift and remove it from its container. If the root ball is stuck in the container either use snips to cut the container away or place the plant on it's side and gently pound on the side of the container to loosen the root ball.
STEP 3
After having removed the plant from the container, use your hand or a claw tool to loosen some feeder roots around the surface of the root ball. If your plant is root bound, use a stream of water from the garden hose to remove some of the soil from the side and bottom surface of the root ball. This should help to expose and loosen some feeder roots.
STEP 4
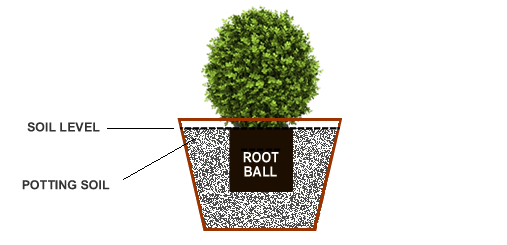
Pour a small amount of your soil mixture in the bottom of the container. Set the plant in the container and make necessary adjustments by adding or removing some soil so that the top edge of the root ball will sit 1/2 to 1" below the rim of the container. Continue filling around the root ball with your soil mixture, tamping as yuou go to remove air pockets, until the level of potting soil is even with the top edge of root ball.

STEP 5
Water thoroughly until water starts to drain from the holes in the bottom of the container. Add more potting mix if settling occurs during watering.
STEP 6 (Optional)
Apply a 1/2" layer of wood chips or sphagnum moss to soil surface to help conserve moisture.
You're done!

