In today's shaky economic times, everyone is looking to save a little and pinch that penny. We're budgeting on our groceries, yet still watching those food prices go up and up. Why not create your own grocery store in your back yard. Even if you have limited space you can grow loads of your own veggies in a raised bed vegetable garden.
Building a raised vegetable garden can be simple, fun, and when grown organically will be far healthier than most of the veggies we get from the chain stores. Plus the feeling of eating what you've grown is priceless.
It's not rocket science...here's how you do it.
Getting Started Building a Raised Bed
Location is important!
First off, you should know that building a raised bed to grow your vegetables in is very easy to do and, once completed, makes growing and harvesting your vegetables much easier to do!
Start by selecting the spot for your raised bed. Since most vegetable plants like as much sun as you can give them pick a sunny spot. The ground will need to be level or such that you can level it. You can be creative in your shape and design - square, rectangular, triangle, or circular, but remember that the best shape is a square or rectangular on with a height of 20 to 24 inches and width of no more than 4 feet so you can reach plants from both sides. This height will cut down on back strain and stepping in your garden when maintaining and harvesting your veggies.
Choose Your Materials
Decide what materials you'd like to use to build your garden with. For an organic raised bed vegetable garden I recommend using untreated lumber such as cedar or redwood. Though more expensive and time and effort is required for construction natural stone is a good alternative. Use whatever you like so long as it is a natural or non-toxic building material. Your goal is a material that will hold the soil in place, and hold up indefinitely or through many growing seasons.
If you choose to use wood, use cedar or redwood because these are untreated and no chemicals will leach into the soil, are insect resistant, are lighter and easier to drill through than other woods and, last but not least, are very attractive woods! Cedar and redwood are a bit pricey but hold up longer to weather, are rot resistant and age attractively. If you don't like the natural weathered look just stain whatever color you like. If you use treated lumber or paint your wood with an oil-based sealer make sure to line the insides with a heavy sheet of plastic so no toxins will leach into your garden soil.
Building Your Raised Bed Garden With Wood
This can be a fun experience for the whole family, but it is also an easy endeavor for a single person.

Here's some step-by-step instructions:
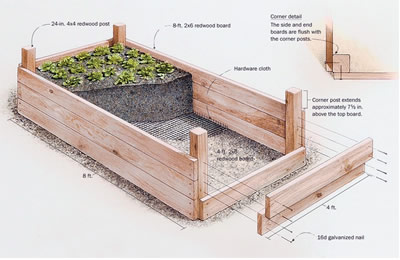
- Outline the shape of your garden on the level ground. Remember, rectangular is best. The bed in the diagram to the right is 4 feet wide by 8 feet in length and 2 feet in height.
- Cut a piece of weed mat (porous landscape fabric) and place it on the footprint of your raised bed. This will significantly cut back on those nasty weeds in your garden. You can also run the fabric up against the inner walls of your raised bed stapling it near the top.
- Using a post hole digger or auger, dig your corner post holes to a depth of 12 to 24 inches. As shown in the drawing above, use 4x4 lumber for corner posts. These posts should be at least 4 feet in length.
- Place corner post in hole with at least 24 inches of the post above the ground. Some gardeners like to leave an extra 6 or 8 inches of the corner posts above the sidewall so that bird netting or plastic can be draped over when necessary to repel birds or to protect seedlings. Use a level to ensure the post is straight up and down. Backfill around post with a concrete mix or packed gravel.
- When corner posts are set, the side and end walls can now be installed. 2x10's or 2x12's can be used for the walls. Remember, your sidewalls will need to be sturdy enough to hold 24 inches of soil so avoid using a thinner board. Use lag screws with washers to connect the sidewalls to the corner posts. Lag screws work better than wood screws for long term sturdiness. You will need a lag screw driver attachment for your drill and/or a socket wrench to tighten the screw all the way. You'll need a table or power saw to cut the wood; after cutting, paint the wood on all sides with an oil-based sealer if you like - but, remember to line the inside with plastic to avoid leaching into your garden soil.
- Now you're ready to fill your garden with soil. Fill approximately 1/3 of your garden with potting soil and manure compost. You can save money by using native soil from another area of your property to fill the rest. Mix this combination thoroughly.

