All types of raspberry bushes, from red and golden to purple and black varieties, are very easy to grow. Plus, they are great for providing bountiful color and nutritious fruit in the edible landscape or garden!
Here's a breakdown of what you need to know to plant raspberry bushes...
Cultural Preferences
Soil Preferences
Raspberries will grow reasonably well in most soil types with the exception of very compacted clay or light chalky soil. In these soils it'll be worth your time to mix in lots of organic compost to condition the soil and add beneficial nutrients and bacteria plants need to grow healthy. They grow and produce the best fruit in a moist but well-drained soil rich in organic matter. They like the soil to hold a good supply of water, especially when the fruits are developing in summer, but not so much water that the soil stays constantly soggy or wet. Plant raspberry bushes on raised beds or mounds if drainage is a problem.
How To Test Soil Drainage
If you are uncertain about soil drainage in the area you intend to plant your raspberries, it's well worth taking the time to test it before planting.
To test soil drainage, dig a hole 12" wide by 12" deep in the planting area. Fill the hole with water and let it drain. Then, after it drains, fill it with water again, but this time clock how long it takes to drain. In well-drained soil the water level will go down at a rate of about 1 inch an hour. A faster rate, such as in loose, sandy soil, may signal potentially dry site conditions. A slower rate indicates poor draining soil and could be a caution you might need to improve drainage, plant in a raised mound or bed, or look for plants that are more tolerant of wet or boggy conditions.
Soil pH
Raspberry plants grow best in a moderately acid to neutral soil ranging between 5.5 to 6.5 on the pH scale. Most average garden soils fall between a pH range of 6.0 to 7.0.
Testing Soil pH
Soil pH is a measurement of the alkalinity or acidity of soil and is measured on a scale of 1-14, with 7 as the neutral mark. Any measurement below 7 indicates acid soil conditions, and anything above 7 indicates alkaline.
If you're unsure about the pH of your soil, or whether or not it is suitable for growing raspberry plants, it's a good idea to test the pH in the planting area. You can quickly test soil pH with an inexpensive soil pH tester probe. To raise the pH (make more alkaline) you can add pelletized limestone to the soil. To lower the pH (make more acid) you can apply Soil Sulfur, Aluminum Sulfate, or Chelated Iron. Adding organic compost to the soil or using compost as mulch can also help to increase acidity and maintain acid soil conditions.
Learn More: What is Soil pH and How To Adjust It?
Light Preferences
Raspberry plants grow and produce the most fruit in full to mostly sun, however will produce a good crop of berries provided plants receive at least 6 hours of direct sunlight.
How To Plant Raspberry Bushes
See trellising instructions further below
When To Plant Raspberries
Bareroot Plants - Plant these in late winter or early spring. Roots of raspberry plants are very sensitive to light so it's best to plant them on a cloudy day.
Container-grown Plants - These can be planted year round.
Suggested Raspberry Plant Spacing
Red Raspberries - The favored planting system for red raspberries is the narrow hedgerow. Set red or yellow raspberries every 2 to 3 feet in rows at least 6 feet apart. Allow new primocanes to spread along the row but not wider than 12 inches. Wider rows invite fungal diseases because of slow drying conditions.
Black & Purple Raspberries - Set these out with 4 feet between plants and 8 feet between rows. Because these cultivars do not produce root suckers, they should be maintained in a hill system. The "hill" does not mean mounding the soil; it refers to the cluster of canes that develops from a single plant. Although black and purple raspberries do not send up new primocanes outside the hill, they can spread: the long, vigorous canes often arch down to the soil surface, where they may take root. It's important to keep the canes controlled and trellised.
Step-By-Step Planting Instructions
The planting methods for raspberry will vary depending on whether you purchased bare root or container-grown plants. All varieties of raspberry will appreciate support in the form of a fence or a simple trellis system. More on the trellis system further below.
Note For Bare Root Plants: If your plant is bare root, before planting, shake the packaging material off the roots and then soak the roots in a bucket of water for several hours before planting. This keeps the roots from drying out, which you definitely don't want to happen. This is one reason I prefer container-grown raspberry plants. Also, cut newly planted bare root raspberries canes to 6 inches in height.
Step 1
If you're planting raspberries in a row, the soil can be tilled 8 to 12 inches deep in a band a few feet wide. If the planting site stays consistently soggy, to ensure good drainage plant on raised beds or mounds 6 inches or more in height and several feet wide. If you are planting individual plants in the ground, without tilling, dig a hole 18 inches wide and a few inches deeper than the root ball. Place dirt removed from the planting hole around the perimeter of the hole, in a wheel barrow, or on a tarp.
Step 2
Depending on the type, fertility and porosity of the soil in the planting area, it may be beneficial to amend the native soil. When planting in heavy clay or chalky soil mix in compost or a good planting mix at a 50/50 ratio with the soil to enhance porosity and ensure good drainage. When planting in a sandy or quick-draining soil, amending with top soil, organic compost, and/or peat moss will help to retain moisture and supply vital plant nutrients. When planting in a fertile, loamy, moist but well-drained soil there may not be a need to amend soil.
Step 3
To remove your raspberry plant from the container it was growing in, grasp the base of the plant with your finger tips and very gently try to lift and remove it from the container. If the root ball is stuck in the container, to avoid damaging your plant, it's best to use snips to cut the container away. After having removed the plant from the container, gently loosen some feeder roots around the surface of the root ball.
Step 4
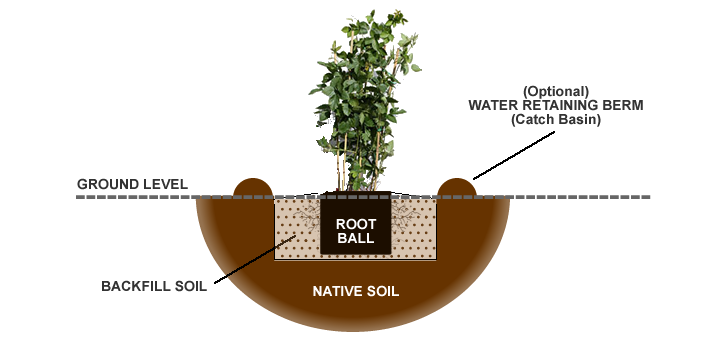
Set your plant in the planting hole so that the top edge of the root ball (or the crown of a bare root plant) is at or slightly above ground level to allow for settling. It may be necessary to place some of your backfill soil mixture in the bottom of the hole to achieve proper planting height.

Step 5
After setting your plant in the planting hole, use one hand to hold the plant straight while using your other hand to begin backfilling the soil mixture around the root ball, tamping as you go to remove air pockets. When you have filled the hole to the halfway point you can soak the soil. Then continue backfilling to the top edge of the root ball. To avoid suffocating your plant, avoid placing any soil on top of the root ball.
Step 6 (Optional)
When planting in a location that is far from a water source, you can use remaining soil mixture to build a water retaining berm (catch basin/doughnut) around the outside perimeter of the planting hole, as shown in the diagram above. This basin will help to collect water from rainfall and irrigation often reducing the need for hand-watering. The berm can be removed after a year when the plant has established itself.
Step 7
Next, deeply water the planting area, including the root ball, to a depth equal to the height of the root ball.
Step 8
To conserve moisture and suppress weed growth, apply a 1 to 2" layer of pine bark mulch or pine straw, or a good organic compost. As the mulch decomposes it will add vital nutrients to the soil that your plant will appreciate. Avoid the use of freshly chipped or shredded wood for mulch until it has cured in a pile for at least 6 months, a year is better. Avoid placing or piling mulch directly against the base of the shrub as this could cause problems with the bark.
Trellising Raspberry Bushes
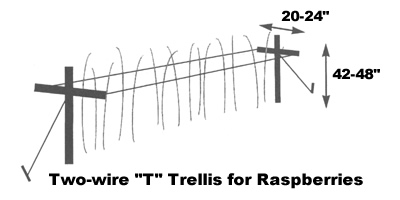
Because canes of raspberry bushes are susceptible to damage from high winds, particularly when heavily loaded with fruit, all raspberry varieties benefit from some type of support system. Supports can be an existing fence or a post and wire trellis system, which is very simple to build.
Wire Trellis-Hedgerow System
Raspberry trellises are simple and inexpensive to build. A trellis can help make the crop easier to manage and keep the canes off the ground so that berries are cleaner and easier to pick.

Step-By-Step Trellising Instructions
Step 1
Sink two 8-foot pressure treated 4x4 posts about 3 feet deep in the ground with about 4 feet of the post above ground at anywhere from 10 to 20 feet apart. In sandy soil you'll need to add a quick-setting mortar mix to anchor the posts.
Step 2
Using nails, wood screws or bolts, attach two 20- to 24-inch long pressure treated 2x4 cross arms to support wires at the top of each end-post.
Step 3
Attach a wire securely with u-nails or staples to each end of the cross arm at about 36 inches high for red raspberries and 40 inches high for the black and purple types. Wires can be wrapped one or two times around the post. Make wire as tight as possible.
After having constructed your raspberry trellis, plant the raspberry bushes between the wires and tie them loosely to the wire.

