Need to relocate a shrub or tree to a new spot in your landscape or gardens? This article is here to provide you with information and instructions that will increase the survivability rate of the plants you transplant.
If you intend on doing the transplanting yourself, lets hope it's not as big as the one in the picture above! If so, you might want to consider letting a professional with some heavy equipment get the job done!
There are two very important things to consider before relocating a shrub or tree:
- When to Relocate. Most importantly, since you will damage some of the roots when digging up the shrub or tree you intend to relocate, know that most all trees and shrubs respond better to transplanting during the dormant season; when the tree is not actively growing. This means during winter. There are a few exceptions to this rule, such as southern magnolia, which prefers to be dug and transplanted in or around August. When in doubt, consult with your local arborist.
- Relocation site. Also very important is choosing the new site where you will transplant your shrub or tree to. Prior to relocating a plant, note the environment the tree or shrub has been growing in: sun, shade etc. Make sure to relocate your shrub or tree to a spot that has similar conditions. Don't expect a Dogwood tree that you've moved from a deeply shaded woodland area to survive when relocated to an area that receives all-day direct sunlight.
Step-By-Step Instructions
Step 1
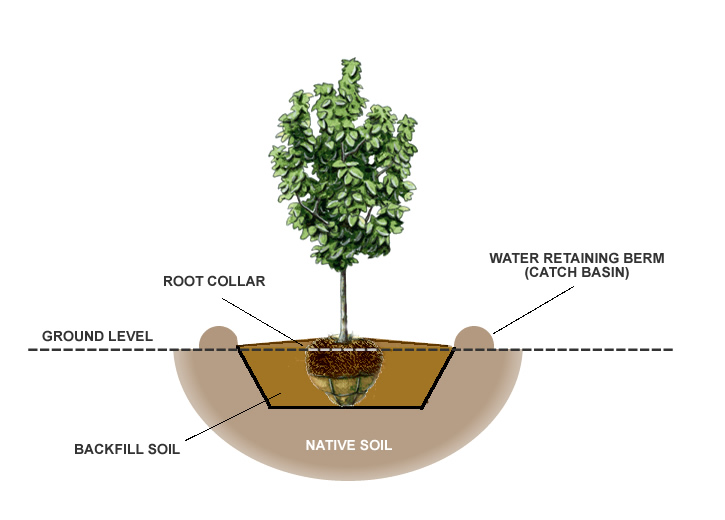
Start relocation by digging the planting hole at the location where you intend to move your plant to. In order to know what size to dig the hole, estimate the width and depth of the rootball. To do this, do a bit of exploratory digging around the plant. The width of the new hole should be twice that of the rootball that will exist after digging up the plant. The depth of the planting hole should be kept a bit shallower, to avoid puddling.
TIP: When digging up your plant try to get as many roots as possible. Fortunately, many shrubs and trees are shallow-rooted, which means the bulk of their roots are just below the surface of the ground.
Step 2
After digging the relocation planting hole, when digging in heavy clay soils, it might be beneficial to thoroughly mix in a good conditioner at a ratio of 1/3 part organic matter with 2/3 part the native soil you removed from the planting hole. Bagged top soil will do fine.
Step 3
Next you'll dig the tree or shrub you intend on transplanting. Don't start digging right at the base of a tree or shrub. Instead, if possible, start your digging at a point outside and around the outside perimeter of the branch system. Remember, the general rule of thumb when transplanting an existing shrub or tree is to keep as much of the root system, and the soil around it, intact as possible. With larger plants or trees, you'll have to cut through some roots. Once you've removed enough soil from around the perimeter of the plant, you'll eventually be able to slip your shovel under it and begin to loosen the roots grip on the soil below it. After it's loose, spread a tarp on the ground nearby and gently move the tree or shrub onto the tarp.
TIP: Before moving your shrub or tree, it's a good idea to wrap the rootball with the tarp you placed it on. Then wrap the rootball with the tarp and tie it around base of the trunk, and around the rootball, with string. Doing so will keep soil from falling away from the roots during transport to the relocation site.
Step 4
A light to medium shearing or pruning of most transplants is recommended. During the digging out process some roots are almost always damaged or cut. To compensate for this root loss, I usually remove 10 to 20 percent of the existing foliage on the outside of the plant to help the recovery process. The more roots that are damaged the more I prune.
Step 5
Using the tarp as a transporting medium, drag the tree or shrub over to the new hole. With larger plants you'll probably need some help. Gently slide the rootball into the relocation planting hole and set it straight. Make sure that the top of the rootball is level with the existing ground around the hole, or at the same level it was in it's original location.
Step 6
Next, begin to shovel the excavated soil back into the hole under and around the roots of your plant. Tamp this soil down firmly and water a little as you go to eliminate any air pockets. Air pockets can cause the tree or shrub to shift after transplanting.

Step 7 (Optional)
After backfilling the hole you can use leftover soil to create a water retention ring around your newly relocated plant, as shown in the diagram above. Mound up the soil in a ring just outside and around the perimeter of the rootball, forming a berm that will catch water like a basin. Building this berm will help you achieve your main objective from here on out. Until your transplant re-establishes itself, you'll want to water enough to keep the soil around the roots moist, but not constantly soggy or wet.
Step 8
Immediately after transplanting, deep soak the soil in the planting area, including the rootball, to a depth equal to the depth of the planting hole. For an extra boost, you can water your new transplant with a solution of Root Stimulator, which stimulates root formation and stronger root development. Root Stimulator reduces plant shock and promotes greener, more vigorous plants.
Step 9
Apply a 1 to 2" layer of aged, shredded or chipped wood mulch or a 3-4" layer of pine straw around the planting area. This will help to conserve moisture and suppress weed growth. As the mulch decomposes it will add vital nutrients to the soil that your plant will appreciate. Do not use freshly chipped or shredded wood for mulch until it has cured in a pile for at least 6 months, a year is better. Avoid placing or piling mulch directly against the base of your plant as this could cause the bark to rot.
Step 10
Fertilize your newly transplanted shrub or tree with a mild, organic or natural plant food or a slow-release shrub and tree fertilizer.
Staking a Newly Planted Tree
Staking won't be necessary for smaller shrubs. On the other hand, taller trees that will be exposed to wind should be staked to stabilize the tree and the root ball.
 Single Stake Method
For smaller trees, use one long stake driven firmly into the ground so that it crosses the trunk of the tree at an angle a foot or two above the ground (depending on height of tree). Use a piece of cloth or a section of rubber water hose to tie trunk loosely against the stake. Avoid using metal wire as this couple damage the bark of your tree.

Staking Tree Triple Method
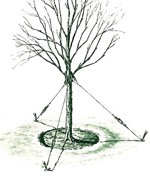
For taller trees, you can drive three 15 to 18" long stakes at a 45 degree angle into the ground beyond the outside perimeter of the planting hole. Space the stakes evenly around the planting hole. Use wire or nylon string to tie from the stake to the tree. Make sure to run the string or wire through rubber hosing to protect the trunk of the tree from rubbing damage. More on that just below.

You will need to tie to the trunk of the tree above some branches so that the guy wires do not slide down the trunk. To prevent damage to the bark of your tree, rubber hosepipe should be used where the wire touches the stem or branches.
A final word...
Now say a prayer than your shrub or tree doesn't go into shock. No, there is always a chance that your tree will not survive transplanting, though if you followed all the tips in this article you've substantially increased the odds!

