
Ajuga, commonly called bugleweed, are very easy to grow. When planted right and in the right spot they will return year after year in your gardens. They are ideal for use as a groundcover or for underplanting leggy shrubs and small trees.
Here's a breakdown of what you need to know regarding planting and growing Ajuga...
Soil
Ajuga tolerates and grows well in a wide variety of soils, except for constantly soggy or wet soils, which are a killer. So make sure to plant them in a well-drained site!
Soil pH
Soil pH is a measurement of the alkalinity or acidity of soil, which is measured on a scale of 1-14, with 7 as the neutral mark. Any measurement below 7 indicates acid soil conditions, and anything above 7 indicates alkaline.
Ajuga plants grow best in an acid to slightly acid soil ranging from 4.5 to 6.5 on the pH scale. Most average garden soils fall between a pH range of 6.0 to 7.0.
If you're unsure about the pH of your soil, or whether or not it's suitable for growing Ajuga, it's a good idea to test the soil pH in the planting area. You can quickly test soil pH with an inexpensive soil pH tester probe. To raise the pH (make more alkaline) you can add pelletized limestone to the soil. To lower the pH (make more acid) you can apply Soil Sulfur, Aluminum Sulfate, or Chelated Iron. Adding organic compost to the soil or using compost as mulch can also help to increase acidity and maintain acid soil conditions.
NOTE: Under the description tab on every plant page in Wilson Bros Gardens you'll find the soil pH range the plant will perform best in.
Light Needs
Ajuga will grow well in full sun to part shade in cooler climates, however prefers some afternoon shade or filtered sun in the South.
Planting Ajuga In Garden Beds
(Scroll down for advice on planting Ajuga in containers and pots)
Step 1
If you are not tilling the soil in the entire planting area, start by digging your planting hole at least two to three times as wide and no deeper than the rootball. The wider the hole the better. Place native soil removed from planting hole around the perimeter of the hole, in a wheel barrow, or on a tarp. When planting in tilled soil just dig the planting hole the same size or a little larger than the rootball of the plant.
Step 2
Depending on the type, fertility and porosity of the soil, you might need to amend the native soil. When planting in dense clay or poor soil it is often beneficial to thoroughly mix in some good organic matter, such as composted manure, homemade compost, sand, and/or a good planting mix at a 50/50 ratio with the clay soil. Doing so usually forms a raised bed or mound that ensures proper soil drainage. When planting in very sandy, quick-draining soil you might need to mix in some top soil, peat moss and/or compost to help retain some moisture. When planting in fertile, loamy, well-drained soil there might not be a need for adding a soil amendment, though some composted organic matter might be beneficial in depleted loams.
Step 3
To remove your Ajuga plant from the container it was growing in, squeeze the container with your hands to loosen the rootball and then try to very gently lift and remove it from its container. Be careful not to damage your plant when removing it from its container! If the rootball is stuck in the container use some snips to cut the container away. After having removed the plant from the container, use your finger tips to gently loosen some feeder roots around the surface of the rootball.
Step 4
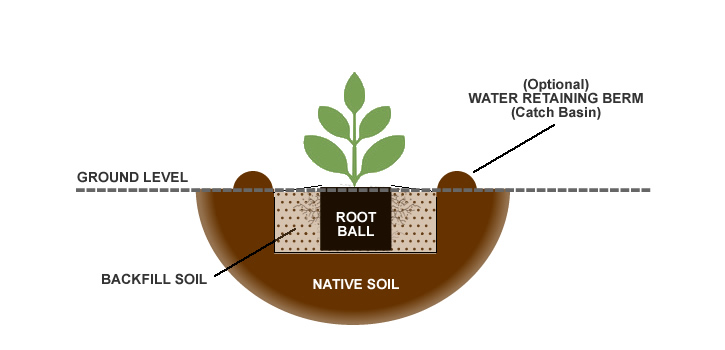
Set your plant in the planting hole so that the top edge of the rootball is at or slightly above ground level.
Step 5
After setting your Ajuga in the planting hole, use one hand to hold the plant straight and your other hand to begin back-filling your soil mixture around the root ball, tamping as you go to remove air pockets. When you have filled the hole to the halfway point you can soak the soil. Then continue back-filling to the top edge of the rootball.
Step 6
Next, deeply water the planting area, including the root ball, to a depth equal to the height of the root ball.
Step 7
Spread a 1-inch layer of shredded or chipped wood mulch or pine straw around the planting area to conserve moisture and to suppress weed growth. As the mulch decomposes it will add vital nutrients to the soil that your plants will appreciate. Avoid using freshly chipped or shredded wood for mulch until it has cured in a pile for at least 6 months, a year is better. Also avoid placing or piling mulch directly against the base of your fern as this could cause the stems to rot.
Planting Ajuga in a Container
When growing in pots, Ajuga appreciate a moist but well-drained soil. Constantly soggy soil is a killer. We recommend using a quality potting mix in a container that has a drainage hole(s).
Make sure to choose a container that is large enough to allow for 2 to 3 years of growth before shifting up to a larger size container. This might mean your planting pot would be 4 inches or more in width than the root ball of your plant. If you will be planting other plants in the same container with your Ajuga up the size of the container.
Container color will matter as well. Not only will you want to pick a color of container that goes well with the foliage color and flowers of your Ajuga, you'll also want to pick a container that matches the style of your home or other structures and other plants in the surrounding environment.
Many nursery & garden centers offer a wide variety of containers to choose from. Before heading out to buy a container take pictures of your home and the surrounding environment. Doing so will help you to choose just the right color and style.
Container Planting Instructions
Step 1
Before filling your container with the soil mix, we recommend lining the bottom with shade cloth or a porous landscape fabric. This will keep the drain holes from becoming stopped up with soil.
Step 2
To remove your Ajuga plant from the container it was growing in, squeeze the container with your hands to loosen the rootball and then try to very gently lift and remove it from its container. Be careful not to damage your plant when removing it from its container! If the rootball is stuck in the container use some snips to cut the container away. After having removed the plant from the container, use your finger tips to gently loosen some feeder roots around the surface of the rootball.
Step 3
Pour a small amount of your soil mixture in the bottom of the container. Set the rootball of your plant in the container and make necessary adjustments by adding or removing some soil so that the top edge of the root ball will sit 1/2" to 1" below the rim of the container.

Step 4
Backfill with your potting soil around root ball, tamping as you go, until the level of potting soil is even with the top edge of root ball.
Step 5
Water thoroughly until water starts to drain from the holes in the bottom of the container. Add more potting mix if settling occurs during watering.
Step 6 (Optional)
Apply a 1/2" layer of bark chips or sphagnum moss to soil surface to help conserve moisture.
Feeding Ajuga Plants
Ajuga plants are light feeders that require little if any fertilizer. Unlike lawn grasses that need regular applications of high-nitrogen fertilizer, Ajuga would prefer an annual feeding in late spring or early winter with a natural or organic plant food. Alternatively, a slow-release low-nitrogen fertilizer can be used. A liquid plant fertilizer can be used at half strength in containers or garden beds.
Watering Ajuga Plants
At planting time, deep soak the soil around the rootball, including the rootball, to a depth equal to the height of the rootball. Thereafter, water as needed based on weather conditions. Keep in mind that the soil in containers and pots will dry out quicker than ground soil. Check soil moisture frequently by touching the soil with your finger tips. Eventually you'll come to know when your plants could use some water.
Pruning Ajuga Plants
Most Ajuga are evergreen throughout most of their growing range and will require little if any pruning. After flowering plants can be deadheaded if desired.